Category Archives: Windows Server

How to export a virtual machine directly to a network share

When moving virtual machines between Hyper-V servers it is often useful to be able to export directly into the folder where the virtual machine will reside on the new host. This saves a lot of time and disk space. Here is what you need to do:
  1. Make sure that both your source and destination Hyper-V servers are in the same forest.
  2. Share the folder where the virtual machine will be exported to.
    (This is on the destination server).
  3. Grant NTFS permissions to BOTH the user running the Hyper-V Manager on the source machine and the computer account of the source machine, for the export folder.
  4. Grant Sharing permissions to BOTH the user running the Hyper-V Manager on the source machine and the computer account of the source machine, for the export folder.
  5. Export the virtual machine using the UNC path of the share you created in step 2 as the destination.

These requirements are also covered in the Hyper-V release notes (http://technet.microsoft.com/en-us/library/cc754747.aspx).

How to install System Center Virtual Machine Manager 2008 prerequisites

Here is a short script that will install the prerequisites for System Center Virtual Machine Manager 2008:

ServerManagerCMD.exe -i PowerShell

ServerManagerCMD.exe -i Web-Server

ServerManagerCMD.exe -i Web-Asp-Net

ServerManagerCMD.exe -i Web-Metabase

ServerManagerCMD.exe -i Web-WMI

Since ServerManagerCMD.exe is deprecated in Windows Server 2008 R2 and has been replaced with PowerShell cmdlets, here is the PowerShell command as well:

Add-WindowsFeature Web-Server,Web-Asp-Net,Web-Metabase,Web-WMI

Remember to do ImportSystemModules or Import-Module Servermanager first.

No need to do PowerShell since it is already installed on Windows Server 2008 R2.

Also, remember that SCVMM needs the Domain Functional level to be at least 2, that is Windows Server 2003. The Configuration Analyzer will warn you of this:

image_2_757406E1

How to reinstall Virtual Server 2005 Virtual Machine Additions

The GUI insatller (setup.exe) for the Virtual Server 2005 Virtual Machine Additions do not offer a reinstall or repair option. That means that if you ever experience any problems with any of the additions you are forced to first remove the additions, reboot, reinstall them and the reboot again. But if you use the MSI directly with msiexec.exe instead of setup.exe you have some more options. This command will reinstall the additions on your virtual machine:

Msiexec.exe /faums VirtualMachineAdditions.msi

You need to mount the Additions.iso file and change to the Windows directory in the ISO image.

More info about msiexec.exe parameters here: http://technet.microsoft.com/en-us/library/cc759262.aspx

Setting up Outlook Anywhere with Outlook 2007/Exchange 2007, NTLM authentication and ISA Server 2006

Introduction

There has been a lot of talk in various forums about how to get Outlook Anywhere to work with NTLM authentication through ISA Server 2006. This has also been a high priority for me since single-sign on is a great feature. Users, when logging on from domain joined computers, should not have to enter their network credentials when accessing any service on the corporate network. This post will explain one way of setting up Outlook Anywhere to use single-sign on. I use Outlook 2007 and Exchange 2007 in my set up. Perhaps this is also possible with Exchange 2003 and Outlook 2003, but I have not investigated that. I also make certain assumptions about the readers of this post; I assume you are well versed in both ISA 2006, Exchange 2007 and Window Server terminology and functionality, this is not a detailed step-by-step guide.

The set up

I have 4 machines participating in this set up:

  • LAB-DC1: A Windows Server 2003 R2 Domain Controller
  • LAB-ISA: A Windows Server 2003 Server running ISA Server 2006 (with the Exchange 2007 publishing patch)
  • LAB-EXCH: A Windows Server 2008 (x86) running Exchange 2007 Service Pack 1 (Mailbox, Hub Transport and Client Access Server)
  • VISTA01: A Windows Vista with Service Pack 1 client running Outlook 2007 with Service Pack 1.

The three servers are all on the internal network, while the Windows Vista client is on the Internet. The ISA server is publishing Outlook Anywhere.

 063008_2015_SettingupOu1

Fixing the Windows Server 2008/Exchange 2007 SP1 IPv6 bug

The DS proxy component of Exchange 2007 has a bug where it does not listen on the IPv6 addresses of a server. This causes Outlook Anywhere clients not to be able to connect to Domain Controllers and query Active Directory. The clients can successfully connect to the Exchange server using MAPI, but Active Directory access does not work. The way to fix this depends on what Exchange set up you have. If you have the CAS role on a separate server you need to follow these steps (from the MSExchange Team blog):

  1. Unselect IPv6 from the properties of your NIC (on the RPC-over-HTTP Proxy machine); that will force the RPC-over-HTTP Proxy to use IPv4 to talk to Exchange and everything will be fine. In most cases, this step suffices. If it does not, continue with steps 2 and 3.
  2. Under the regkey HKLM\SYSTEM\CurrentControlSet\Services\Tcpip6\Parameters, add a 32 bit DWORD with the name Disabled Components and value 0xFF
  3. Reboot the machine

If you’re in a single-server scenario where the RPCProxy and Mailbox are on the same machine, then the above does not work since the loopback interface still uses IPv6. In this case, you need to make the following changes in the system32\drivers\etc\hosts file:

  1. Comment out the line “:::1 localhost”
  2. Add the following two lines:
    <IPv4 address> <hostname of the computer>
    <IPv4 address> <FQDN of the computer>

A more thorough explanation of this issue can be found here, as well as a good description of how Outlook Anywhere works:

http://msexchangeteam.com/archive/2008/06/20/449053.aspx

http://blog.aaronmarks.com/?p=65

How to set up Outlook Anywhere with Single-Sign On

Exchange 2007

  1. If you have not already done so; install the RPC Proxy component on the CAS server.
  2. Enable Outlook Anywhere on the CAS server:
    Enable-OutlookAnywhere –DefaultAuthenticationMethod Ntlm –ExternalHostName outlook.lab.com
  3. Install an SSL certificate on the web site hosting Outlook Anywhere.
    This certificate must contain the public name where you are hosting Outlook Anywhere, as well as any other names that is required in your setup.
  4. Configure the OAB to use HTTPS:
    Set-OabVirtualDirectory –Identity ‘LAB-EXCH\OAB (Default Web Site)’ –RequireSSL $true
  5. Set the external name of the OAB virtual folder:
    Set-OabVirtualDirectory –Identity ‘LAB-EXCH\OAB (Default Web Site)’ -ExternalUrl https://outlook.lab.com/OAB -InternalUrl https://lab-exch.lab.net/OAB
  6. Export the SSL certificate and install it on the ISA server.

ISA Server 2006

Create a standard publishing rule for Exchange2007 Outlook Anywhere; select to publish additional folders for Outlook 2007 clients:
 063008_2015_SettingupOu2

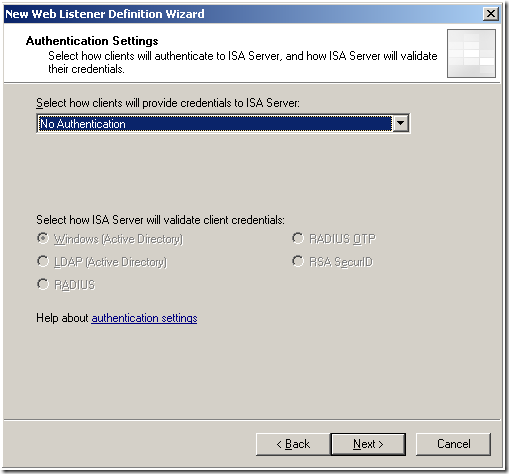
  1. During the creation of the publishing rule; create a new listener for Outlook Anywhere, on the Authentication page, select No Authentication:
     063008_2015_SettingupOu3
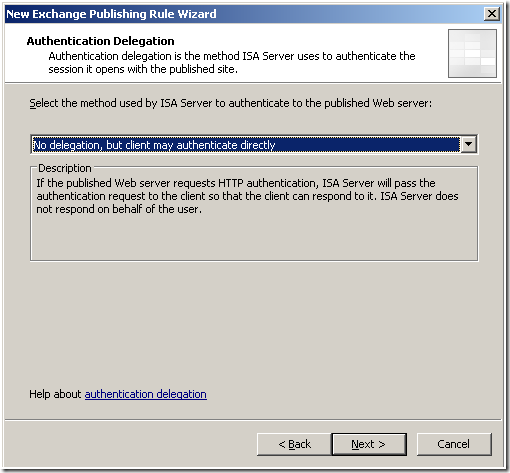
  2. Back in the rule wizard, select the No delegation, but client may authenticate directly option:063008_2015_SettingupOu4

Client/Outlook 2007

  1. Start Outlook 2007 on the client, while it is connected to the internal network. This will cause Outlook to contact the Autodiscover service and automatically configure itself for regular MAPI/RPC operations as well as Outlook Anywhere (HTTP):
     063008_2015_SettingupOu5
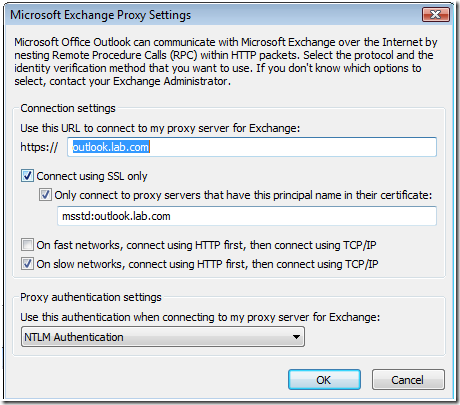
  2. Disconnect the client from the internal network and connect it to the Internet. Open Outlook:
    063008_2015_SettingupOu6
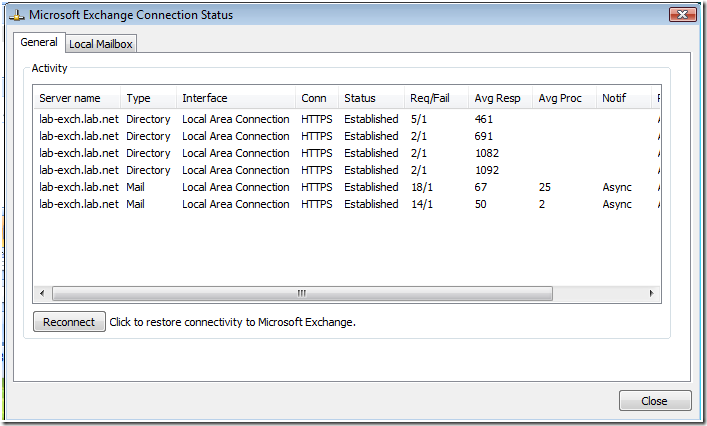
    Outlook will connect to Exchange without requiring a username or password. The Connection Status box will show a successful connection:
     063008_2015_SettingupOu7
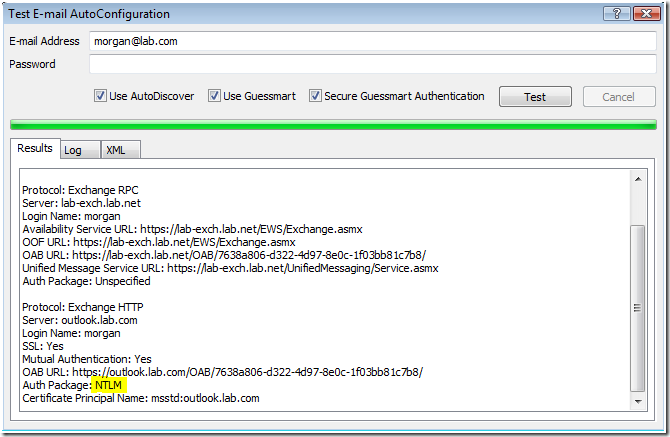
  3. Run the Test E-mail AutoConfiguration tool:
    063008_2015_SettingupOu8
    As you can see the Autodiscover service was successfully contacted. The AS service is also set to accept NTLM by default.

How it works/notes on security

This setup allows the client to directly authenticate to the Exchange 2007 CAS server, reducing the ISA Server computer to a mere reverse proxy, only performing HTTP inspection, you lose the benefit of ISA pre-authentication. This should not be a major problem, but should be evaluated carefully before implementing in your network.

Unexpected password prompts

If the Outlook client is left untouched for extended periods of time, typically over 1 hour, the connection to the Exchange server is somehow severed, and Outlook will prompt the user for their username and password. You will not be able to reconnect even if you enter the correct username and password. I think this is because ISA server terminates the connection between the Exchange server and Outlook if it is left unused for a long time. The way to recover from this situation is by either restarting the IIS services on the Exchange server or the Firewall service on ISA server. Further investigation is needed to determine the exact cause of this problem.

Conclusion

This has been a quick guide to achieving single-sign on for Outlook Anywhere with Exchange 2007 and Outlook 2007. With this setup you lose ISA pre-authentication. There may be another way to achieve the same result using Kerberos Constrained Delegation (KCD), that will be the topic of a future post.

Installing Windows Server 2008 on a Compaq ProLiant ML310 G1 server

I have an old first-generation (G1) Compaq ML310 server that I use as a multi-server on my home network. Since it is so old the server is only capable of running an x86 OS, but it has 3 GB of memory so I manages the job for my small network. It is certified for Windows Server 2003 and has been happily running that OS for a couple of years now. This weekend I decided it was time to upgrade it to Windows Server 2008.

052508_0005_InstallingW1

Figure 1: The Compaq ML310 G1 Server

First I installed a virtual Windows Server 2008 machine on my desktop computer. I updated the schema for Windows Server 2008 (from my old server, since adprep.exe /forestprep must run on a DC). Then I moved all the services the old server was running, DNS, DHCP, Certificate Authority etc, to the new virtual machine. Finally I installed Exchange 2007 and moved all the mailboxes to the virtual server. Then it was time to decommission the ML310’s workloads and I uninstalled Exchange 2007 and demoted it to a member server. After verifying that no data that I required was left on the old server I popped in the Windows Server 2008 DVD and rebooted. That was when the fun started.

My first snag was to discover that the ML310 does not have a DVD-ROM drive, but a CD-ROM drive. No biggie, I found an old DVD-ROM drive in a closet and installed it. When that was in place I could boot the Windows Server 2008 DVD.

The ML310 has an onboard LSI IDE ATA-100 RAID Controller. The RAID system is pretty simple and you have to create the arrays from the controller BIOS while the OS is down. I have 4 drives in the server, distributed over two RAID 1 arrays. To make windows see the arrays I have to load a driver during OS setup. On Windows Server 2003 this was done pressing F6 at the beginning of setup and popping in a floppy with the required driver. I had been using the driver from the HP website up until I decided to upgrade. The main file of the driver is MegaIDE.sys and the HP driver is version 2.5.2003.613. I figured I would try that driver first and see if I could make it work with Windows Server 2008 and the RAID 1 arrays.

After you have selected which Windows Server 2008 edition you want to install the setup process brings up a listing of available drives in your machine. My list contained 6 items; 4 partitions and 2 unallocated free space, divided over 4 physical disks. This meant that the default Windows driver was not RAID capable. I proceeded to hit the Load Driver button and load the HP driver from floppy. That did not work at all. It found the driver but setup never continued. I figured it might be a bad floppy so I copied the driver files to a USB key instead and tried again. This time the driver loaded successfully but setup still displayed the same 6 items, so that driver was not RAID capable when used with Windows Server 2008 either. What to do?

The HP driver is pretty old so I decided to see if LSI, the manufacturer of the RAID controller, had a newer version. I found one on their website. In this driver package the MegaIDE.sys driver was version 4.1.0709.2003, a definite improvement. Just to be sure I verified that the Plug and Play ID of my controller (PCIVEN_1095&DEV_0649&SUBSYS_007E0E11) was present in the INF file for the new driver. Since it was, I copied it to the USB drive and loaded it in Windows setup.

Success! After the driver loaded, the number of items was down to 3, now showing 2 physical drives (really the two logical RAID 1 drivers) and 2 partitions (one on each drive), plus the unallocated space. Things were looking good. I wanted to do a completely clean install so I decided to delete the old partition on the first physical drive and have setup recreate it. That produced an error, but I was not too deterred by this. I rebooted the server and went into the controller BIOS and re-initialized the array, figuring that it had somehow been corrupted or altered by me messing about with the old driver. Back in setup with the new driver loaded I now had only unallocated space on my drive. I hit Next and Windows Setup proceeded to try and create a new partition in this free space. That produced another error.

Windows could not create a partition. Error 0x80070013.

The 0x in front of the error tells us that this is a hex number and we need to translate it into decimal in order to find out what it means. 13 hex is 19 decimal. Using this command we can get the clear text data from the error:

PS C:WindowsSystem32> net helpmsg 19

The media is write protected.

So I knew what the problem was, just not how to fix it. I rebooted again and went back into the controller BIOS. I deleted the array and recreated and re-initialized it. Booted the DVD once more, loaded the LSI RAID driver. The newly recreated array came up as free space and I selected it and hit next. This time I got no error and Windows Server 2008 started installing.

I still think my theory about the original array becoming corrupted or having been modified in some way to be correct. I did a lot of stuff to the partitions while trying to make the old HP driver work. Circumstantial evidence to back up this conclusion is that the other array is accessible in Windows Server 2008 without problem.

Windows Server 2008 installed successfully and I started configuring the server. I quickly noticed that the server had no network connectivity due to a missing NIC driver. That was, however, the only unknown device. The ML310 uses an HP NC7760 Gigabit Server Adapter, whose driver is not included on the Windows Server 2008 DVD. I downloaded the Windows Server 2003 driver from HP and it installed without problem. All network service ran perfectly. The NIC driver is quite old. Its version is 8.52 and the date 12.01.2006. I decided to look for a newer version. A quick Google search of the hardware IDs of the NC7760 adapter revealed that it is in reality a Broadcom NetXtreme Gigabit Ethernet adapter. I went to Broadcom’s site and downloaded the latest driver. Windows Server 2008 would not upgrade to that driver, since the INF file from Broadcom did not have an exact match for the most specific Hardware ID, like the HP INF file did. Instead of trying to edit the Broadcom INF file and add the NC7760 Hardware IDs I just uninstalled the driver and selected to delete the driver files in the process. Then I could do a search for new hardware and install the Broadcom driver. The new driver is from 17.09.2007 and is version 10.62.0.0, quite an improvement as well.

As an encore I tried to install the RAID management software from LSI. It installed successfully and the Spy program, which sits in the system tray and monitors drive health, worked well. Not so for the MMC snap-in that manages the arrays themselves. It always gives an error and then freezes when I try to start it. Can’t win ’em all I guess.

I finished the server upgrade by promoting it to a DC, adding all the roles (CA, DHCP, etc) and installed Exchange 2007 with SP1. My only regrets are that the computer is not x64 compatible which means that I can’t run a supported version of Exchange 2007, and that I can’t run Hyper-V.

For those who are interested here are the links to the software I have mentioned in this post:

Requesting Web Server certificates from an Enterprise CA

One of the things I have never been able to figure out, is why you cannot request a certificate based on the Web Server template from a Windows Enterprise CA when you are using the CA web pages (<servername>/CertSrv). Ever since Windows 2000 I have occationally stumbeled on this problem but never had time to really investigate it. I still have not found out why the Web Server template is unavailabe, but I have found a workaround.
By using the certreq.exe utility you can successfully request and receive a certificate from an Enterprise CA. The command you use is:
certreq -submit -attrib “CertificateTemplate:WebServer” <request_file>
The request file is any text file (.cer, .req etc.) that contains the Base64 encoded certificate request generated by your server. Typically a web server. When you run this command you are prompted to select the CA from which you would like to request the certificate and the name of the file in which to save the issued certificate. You can also specify these options on the command line.
Since this works, the problem must lie in the CA web pages. If anyone has an explanations as to what may be the problem I would be very interested.
The reason that I went a little further in trying to crack this problem this time, was that I was setting up my Virtual Server host and was unable to get a certificate for the Virtual Machine Remote Console (VMRC). The administration web pages for Virtual Server cannot send a certificate request directly to an online CA, but rather have to generate a Base64 encoded request which you have to submit to your CA manually and then upload the issued certificate to Virtual Server. Using the above command I was finally able to get a certificate. For those of you wondering; no you cannot use one of the certificates that the computer running Virtual Server has in its certificate store. Virtual Server runs under the Network Serivce account which does not have access to those certificates. Some more information about the exact reason for this is availabe here:
Finally, the SSL certificate for the Virtual Server administration site itself can be retreived in IIS using the request new certificate option.

Exploring certificates in IIS

Recently, I’ve been having some issues with certificates in IIS 6.0 that have cause me to perform some operations that I do not normally do. That has taught me a thing or two about certificates in IIS and I have discovered some nice info which I link to in this post.
First off is my discovery that you can actually install a certificate in IIS after you have delete then pending request from ISM. The procedure is described here:
Install certificate after deleting the pending certificate request (IIS 6.0)
The second thing is a KB article that describes how to request a new certificate for a website on a server that already has a certificate, without removing the existing certificate. This is useful if you want to change the identity on the certificate, but not delete your existing certificate right away or cause downtime. The problem here is that you need the private key in the certificate store on the server where you already have a certificate. The procedure is described here:
How To Renew or Create New Certificate Signing Request While Another Certificate Is Currently Installed