How to configure SAML SSO with the Cisco Meraki Dashboard and Azure Active Directory

Introduction

The fine people at Cisco Meraki have recently enabled SAML SSO support to their Meraki Dashboard service. For those of you who don’t know Meraki is Cisco’s cloud managed networking solution. Basically you manage all your networking equipment from a web portal. For more information about Meraki, go here.

Whenever I start using a new web application, which is what the Meraki Dashboard is, I always look for options to integrate it with my existing identity platform, which in my case is Azure AD. The benefits of doing this should be apparent and are not in the scope of this post, but basically I want to control access to all applications with one identity and thus limit the numbers of logons I have to maintain.

Note: Let me just mention that at the time of writing; the SAML SSO feature of the Meraki Dashboard is in Beta.

So let’s look at how we can now integrate Azure AD and Meraki.

Setup

Meraki have provided their own documentation on how to set up SAML SSO with either ADFS or OneLogin, this documentation is available here. But we want to use Azure AD.

Configure SSO

In this section we complete the basic SSO setup.

  1. First enable SAML SSO for your organization. Just enable it for now and press Save.
    merakisamlsso1
  2. Go to the Azure portal and add a new application to your Azure AD tenant. Select to add an application from the gallery and then select Custom. Name your application something like Meraki Dashboard:
    merakisamlsso2
  3. On the page of your newly created application select Configure single sign-on.
  4. Select Microsoft Azure AD Single Sign-On as the sign on method.
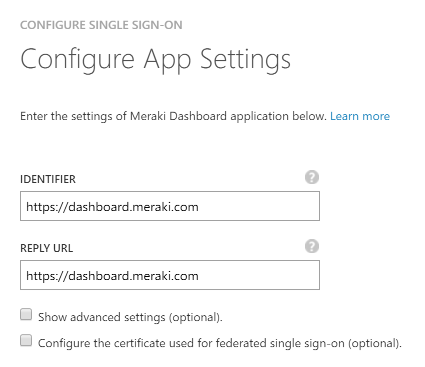
  5. For your application identifier and reply URL enter https://dashboard.meraki.com.
    merakisamlsso3
    NOTE: We will change the value of the Reply URL in the following steps.
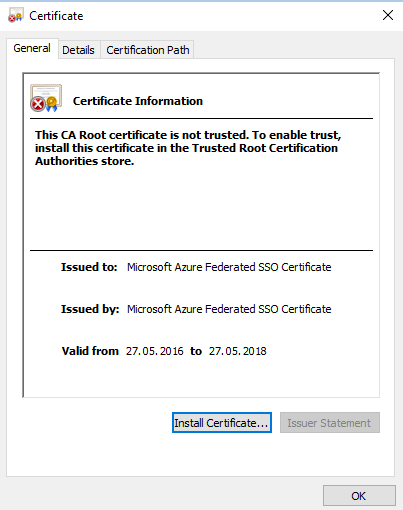
  6. Download the certificate in Base 64 format and open it.
    merakisamlsso4
  7. On the Details tab, find the certificate thumbprint and copy it.
  8. Go back to the Meraki Dashboard and paste the thumbprint value into the X.509 cert SHA1 fingerprint field. You must replace all spaces with colons. Hit Save. You should now have a Consume URL displayed, it will look something like this:
    https://n150.meraki.com/saml/login/<unique ID>. Copy this value, we need it later. Enter the URL of the Azure AD MyApps portal in the SLO logout URL field. Your complete configuration should now look something like this:
    merakisamlsso5
    The logout URL is where the Meraki Dashboard will redirect users when they sign out, this location should be where they can sign in again, which in this case is the MyApps portal.
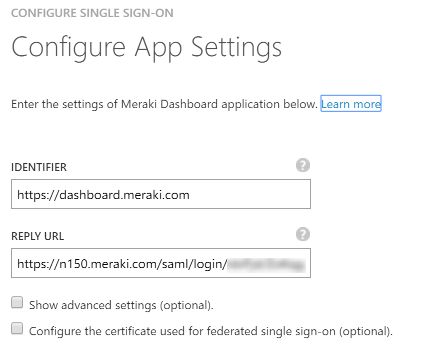
  9. Go back to the Azure AD portal and go back one step in the Configure Single Sign-On wizard to enter this value into the Reply URL box. Reply URL is also known as Assertion Consumer Service (ACS) and is where the application expects the authentication response from the IdP. Your final settings should look like this:
    merakisamlsso6
  10. Advance to the page of the wizard where you downloaded the certificate and check the box labelled Confirm that you have configured single sign-on as described above. Checking this will enable the current certificate to start working for this application.
  11. Finish the Configure Single Sign-On wizard.

Configure SAML Roles in your Meraki organization

Now we need to configure roles in Meraki Dashboard to control the level of access that SSO users get. You can configure many roles and granular network access here, but we will create only one role.

  1. Go to the Meraki Dashboard and navigate tot Organization\Administrators.
  2. Find the SAML administrator roles section and select Add SAML role
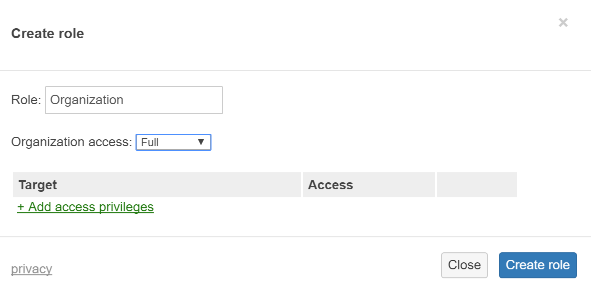
  3. Name the new role Organization and set organization access to full, do not select any target networks:
    merakisamlsso7

Configure Claims

In this section we configure the claims that the Meraki Dashboard needs to work. Currently Meraki Dashboard requires a username and a role claim, issued using their naming standard.

  1. In the Azure AD portal, go to the Attributes tab of the Meraki Dashboard application.
  2. Add the following attributes:

Attribute name: https://dashboard.meraki.com/saml/attributes/username

Attribute value: user.userprincipalname

Type: User attribute

Attribute name: https://dashboard.meraki.com/saml/attributes/role

Attribute value: Organization

Type: Constant

Feel free to delete any claims you don’t want to send to the Meraki Dashboard.

Configure Access to the Meraki Dashboard application

In this scenario we use Azure AD as the control plane for who gets the Organization role we specified earlier. We do this by assigning the Meraki Dashboard application to the specific users we want to be organization admins.

  1. In the Azure AD portal select the Users and Access tab of the Meraki Dashboard application
  2. Select Show: All Users in the drop down box.
  3. Select the users you want to be organization admins and hit Assign at the bottom of the page.

About Roles in this setup

As you can see from the above configuration, all users that are assigned the Meraki Dashboard application will get full Organization access, based on the role we created This is almost certainly not what you want, but this is just an example. In the Meraki guide for ADFS we see that they use Active Directory groups to select which role is passed in the claim. Unfortunately, the logic to do this is not available in Azure AD at the moment. You cannot select a claim value based on a group. What you can do instead is use a free attribute in either your local Active Directory or Azure AD to specify the name of the Meraki role to give the user. To accomplish this you must first map out all the Meraki roles you need and then provide the names of these roles in the role claim, based on the value of the attribute.

Testing access

Now let’s see if it worked.

  1. Log in to the Azure AD MyApps portal as one of the users that you assigned to the Meraki Dashboard application; https://myapps.microsoft.com.
  2. Meraki Dashboard show now show up as an available application:
    merakisamlsso8
  3. Hit the icon and you should now be forwarded to the Meraki Dashboard.
  4. Notice that your username at the top is now your User Principal Name from Azure AD.
  5. Navigate to Organization\Administrators and hit SAML login history. This will display all SAML logins to the dashboard. Your login should show up here. You can also press the value in the timestamp and you will see more details, and you can even view the entire XML assertion.

Further customization

Hopefully everything is working for you. If you want to further customize this setup you could for example add a logo to your app and remove the claims not needed by the Dashboard. You now also have access to all the advanced access policies of Azure AD and can add MFA and location based access rules and provide delegated self-service access.

Notes about the setup

There are a few things to note about the Meraki SSO support in general and this setup in particular.

  • Meraki Dashboard currently only supports Identity Provider (IdP) initiated sign-on. This means you have to start in the Azure MyApps portal, log in, and then proceed to the Meraki Dashboard by pressing the icon. Going to the dashboard first and trying to log in with an ID from Azure AD (or any IdP) will not work. This last scenario is what is known as Service Provider Initiated sign-on (SPinit). (I’m thinking you should be able to create a smart URL here, but have not have time to test that yet.)
  • If the username of the admin that signs in with SSO is already registered as a regular dashboard admin the sign in will fail.
  • There is already a pre canned Cisco Meraki Dashboard app in the Azure AD application gallery, but this only supports password SSO, which means that you will have to enter your regular Dashboard account login details into the Azure AD credentials vault and then have Azure AD forward those credentials when users sign in. This is not true SSO. However, I recommend you harvest the icons from this app and use in the one you create. (The URL of the logo is: https://az495088.vo.msecnd.net/app-logo/merakidashboard_215.png)

More information

For more information on Meraki Dashboard permissions and administrator types, refer to the article on managing administrative users

How I work with multiple identities in Google Chrome

Introduction

I spend my time working with public cloud services for a large number of organizations. That means many, many different user accounts to keep track of. The tool I use most to interact with these services is the web browser. As you all know browsers try to make life easy for their users, and therefore they cache a lot of information, including logins, cookies and AuthN tokens (these are cookies too). All in an effort to make it easy for an end user to get to his stuff quickly. But we are not end users are we…? For me all this caching is very inconvenient when I need to be someone other than my own identities, which is all the time. And not only that but at the same time that i want to operate as myself. Here is how I have this set up today.

The Browser

For me Google Chrome works best. It has the features I need, simple as that. My reasons are laid out below.

Securing Login Information

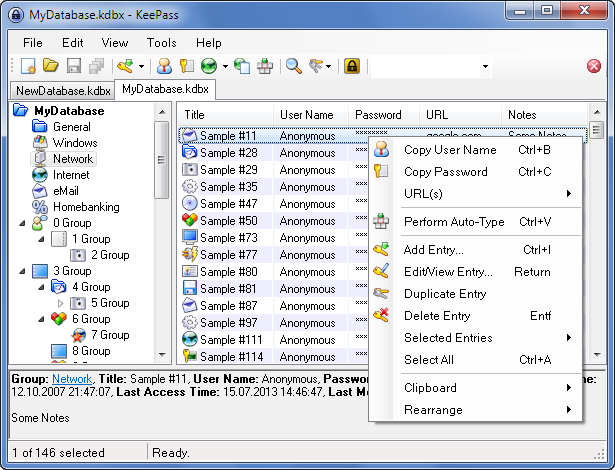
I keep all my login information secure in a KeePass 2 database. I choose KeePass 2 because it has good encryption (AES-256), great multi-platform support, lots of plugins, good security features like automatic workspace lock, is open-source and free. I keep my KeePass databases in a cloud storage account protected with Multi-Factor Authentication (MFA). KeePass lets me generate long, complex passwords easily so I never (ever) reuse passwords anywhere.

main_big

Accessing Login Information Easily

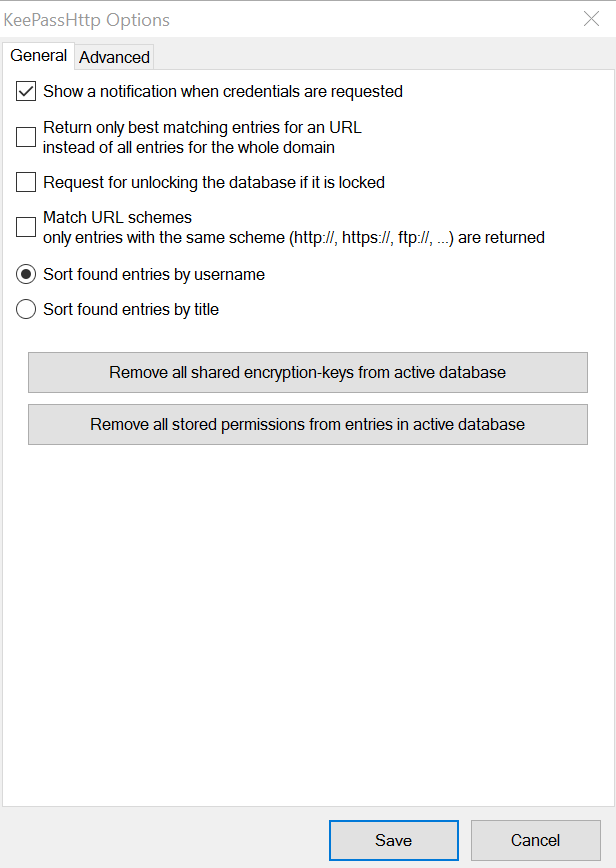
I mentioned that KeePass has great plugin support. One of my favorite plugins is KeePassHttp, which exposes password entries securely over HTTP. It creates a local HTTP endpoint that authorized clients can talk to. Authorization is controlled in KeePass and is thus protected by the KeePass master password and any other factors you may have chosen.

keepasshttp

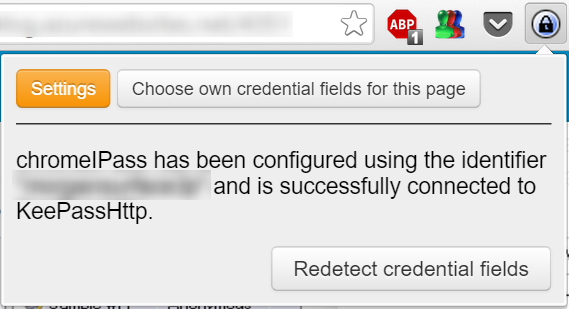
KeePassHttp together with the Chrome extension chromePass completes this setup by serving up the necessary login information based on URL. chromePass connects to KeePassHttp and retrieves the login information from the KeePass database that matches the URL of the site you are visiting. If several entries match you get a list to choose from. By default KeePass will not just serve up the login information, you have to approve it from a prompt displayed by KeePass.

chromePass

Multiple Personalities – in a good way

The final piece of the puzzle is the Chrome plugin MultiLogin. It takes care of the problem of the browser trying to cache your login information and state in cookies. Whenever you hit the MultiLogin button Chrome starts a completely clean browser tab that is not related in any way to what is going on in any other tabs. Each new MultiLogin tab is identified by a number so you can easily tell them apart. All tabs with the same identifier share the same state, so you can have several tabs where you are the same user. Everything in the MultiLogin tabs is destroyed when you close Chrome so nothing will be remembered.

I use regular Chrome tabs for my own private web surfing, and Chrome caches my logins and stores cookies just like normal. For everything else I use MultiLogin tabs. This also has the added security benefit of never storing any session or AuthN cookies when you close Chrome.

multilogin

Unfortunately the developer has removed MultiLogin from the Chrome Store for unknown reasons, and I have not been able to find a replacement. I was lucky enough to install it when it was available, so thanks to Chrome’s roaming extension feature I get it on all my computers. If you still want to get MultiLogin there are instructions here for installing it manually.

UPDATE 27.10.2016: A new Chrome extension called openMultiLogin has been released that replicates the functionality of MultiLogin. Check it out in the Chome extensions store.

Good luck!

Error 0x80070001 on Windows 10 when trying to install a new app

This is slightly off topic for me, but because I spent quite a bit of time on figuring it out and could not find this documented anywhere else, I thought I would write it up quickly.

At some point I could no longer install any new apps from the Windows Store on my Surface 3 Pro Windows 10 machine. Apps already installed would update fine, but new ones could not be added. The error was:

“Try that again. Something went wrong. The error code is 0x8007001, in case you need it”.

If we translate that number to a human readable form we get:

Incorrect function.

Not much to go on. I initially thought this was something to do with either the modern app framework or Windows installation and tried things like resetting the store with (WSReset.exe) and scanning the system files with SFC.EXE. None of these things helped. In the end it turned out that is was related to my SD card. I had an  SD card installed and had previously moved a few apps to it. Apps that were so large that I didn’t want them eating up my system drive. Moving these apps somehow caused all new apps from then on to try to install on the SD card, or at least rely on it for something during the install. I shut down the computer, removed the card and could then install apps again. At this point I also reinserted the card and could now also install new apps with the card inserted. Some setting somewhere had obviously been changed. I do not know the root cause of this behavior, which is always annoying, but I am prepared to accept that I made it work.

Updating already installed apps worked because they were all on the correct (C:) drive. The default install location for apps was also set to the C: drive, which makes this even stranger…

Hope this helps someone. Happy installing!

Obtaining the latest setup binaries for the OneDrive Next Generation Sync Client

Microsoft is working on creating a unified OneDrive Windows sync client for both consume OneDrive and OneDrive for Business. This is very good news and you can read all about it here.

But the download links on the Office support pages are not for the latest version of the Next Generation Sync client (ODNGSC). At the time of this writing the latest version is 17.3.6349.0306, but the download link is for 17.3.6302.0225.  So why does this matter? The ODNGSC updates itself as part of an Office 2016 update cycle or individually. When you deploy the client you might have some issues that are blocking you, stopping you from completing setup. If that is the case the client cannot update itself, because initial setup has not been completed. So you can’t get the version that might fix your setup problem. Catch 22.

Right now, one such problem is trying to use ODNGSC in Azure RemoteApp (ARA) images. In ARA users’ profiles are redirected to profile disks (VHDs) stored in Azure storage accounts. The redirection happens by using a reparse point linking the VHD to the user’s %USERPROFILE% path. The ODNGSC will not accept a path that includes a reparse point so you cannot install the client. If this error was fixed in a more recent release than the one currently installed or available for download, you would face the above problem. (So right now, this trick does not help you, but it serves to explain why I wanted to get to the latest client binaries.)

To work around this and perform initial setup with the latest ODNGSC, do this:

On a machine that has the latest version, navigate to:

%LOCALAPPDATA%\Microsoft\OneDrive\Update

In that folder you will find the setup file (OneDriveSetup.exe) for the latest client. If you look in the Update.xml file in the same directory you will also find the URL of where that client was downloaded, something like https://oneclient.sfx.ms/Win/Team/17.3.6349.0306/OneDriveSetup.exe.

Estonian e-Residency

I just applied for e-Residency in Estonia!

snip_20151215123126

As an e-Resident you are issued a secure digital identity by the government of Estonia. This enables you to use services provided by the Estonian state agencies and private sector. Thing you can do:

  • Establish a company online
    Estonian companies can be established, registered, and administered entirely online.
  • Open a bank account in Estonia
    Estonia is well-known for its user-friendly and secure online banking. The e-Resident smart ID card is approved by LHV, Swedbank and SEB banks in Estonia, with others planned in future.
  • Digitally sign documents and contracts
    Digital signatures have been available in Estonia since 2000 and are used daily. More than 200 million digital signatures have been created in Estonia since inception.

As someone interested in digital identities I think this is fantastic stuff, and heralds the coming of a new age of business. Looking forward to visiting the Estonian consulate in Oslo to pick up my ID card.

Read more about Estonian e-resicency here:

  • https://en.wikipedia.org/wiki/E-residency_of_Estonia
  • https://e-estonia.com/e-residents/services-and-benefits/


Office 365 Hybrid Configuration Wizard fails due to DateTime.MinValue issue

I was helping a customer set up a hybrid Exchange environment recently. When the time came to run  the Office 365 Hybrid Configuration Wizard we received this error:

utc

The error given is:

The UTC time represented when the offset is applied must be between year 0 and 10,000.
Parameter name: offset

I asked the Internet and quickly discovered that this is not a Hybrid Configuration issue, but rather some bug in the .NET framework DateTime function. I soon found this page (quite old as you can see). To quote the author: The value of DateTime.MinValue cannot be cast to a DateTimeOffset if you are east of London!

So the solution in our case was to temporarily set the time zone of the server where we ran the Hybrid Configuration Wizard to UTC (Coordinated Universal Time), aka. GMT.

Connecting to an Azure AD joined machine with an Azure AD user account over Remote Desktop

Introduction

Windows 10 introduces the ability to join a computer to the cloud directory service Azure AD. This is very similar to the traditional domain join, where you join a computer to an Active Directory domain, run on-premises by one or more Domain Controllers. Both operations lets the computer operate within a common security context and benefit from Single Sign-On (SSO) to all resources that share the same security context. However, joining Azure AD instead of a traditional domain can break things or make them more difficult. There are many examples of this, but the one I want to discuss here is connecting with Remote Desktop (RDP) to an Azure AD joined computer with a user account from Azure AD. Just to be clear; the connection we want to establish is to an Azure AD joined computer, logging on with an account from Azure AD. This account can either be synced from on-premises or be mastered in the cloud, and both federated and password logons are supported. We do not depend on any local accounts on the computer, using tricks such as adding an Azure AD work account to a local account or a Microsoft Account (MSA), this is pure Azure AD.

Connecting Successfully

There are some obvious prerequisites for this to work:

  • The computer must be joined to Azure AD
  • Remote Desktop connections must be enabled and allowed through the host firewall
  • Any other firewall between you and the computer must allow the Remote Desktop protocol

The key to connecting is having Windows 10 present an desktop login screen:

win10rdp2

That means that we must disable any form of single sign-on or integrated authentication. This requires the following steps:

  • On the Windows 10 computer; disable Network Level Authentication (NLA) for Remote Desktop Connections
    Open System Properties and navigate to the Remote tab. Under Remote Desktop; make sure Allow remote connections to this computer is enabled, and that Allow connections only from computers running Remote Desktop with Network Level Authentication is unchecked.
    win10rdp3
    This will disable the ability on the host to require that authentication happens before a user session is created.
  • On the computer you are connecting from create an RDP file and add the following settings to it:
    enablecredsspsupport:i:0
    authentication level:i:2
    Again, these settings disables sending any credentials automatically to the host computer. Leaving Windows with no choice but to display a desktop logon screen. The easiest way to create an RDP file is to open the remote desktop client, enter the name or IP of the computer you want to connect to and then his Save As. This will produce an RDP file that you can add/edit the necessary settings in. For those interested, most of the settings you can specify in an RDP file are listed here. In theory you could also add these settings on the command line, but I have not worked that out.

The last trick to make this work involves the username you specify on the logon screen. It must be in the following format:

AzureAD\<full UPN in Azure AD>

e.g. AzureAD\morgan.simonsen@langskip.no

This is a non-intuitive format for those of us who have connected to Windows over RDP in the past, but it is what works. I have not been able to connect with any other combination of domain, username, DNS domain or UPN, but this may very well change soon.

UPDATE 2015-11-7: On Windows 10 build 10586 the AzureAD prefix is no longer needed. You can just use your UPN.

Closing remarks

When you are joined to Azure AD we are naturally also authenticating against Azure AD, but it might be that you have federated Azure AD against an ADFS server, in which case authentications are redirected back to on-premises. Depending on your setup for authentication you will see the following differences:

Azure AD authenticated users will display the logged on user as: AzureAD\<concatenated display name>. Federated tenants will display the logged on user as <on-premises NetBIOS domain name>\<on-premises sAMAccountName>. This difference is visible if you use the whoami utility or look at the environment variables. Just to be clear, these differences do not have anything to do with remote desktop connections, they are just a consequence of joining Azure AD.

Connecting with a local account to a Windows 10 computer joined to Azure AD would as it does for any other Windows computer.

This is probably not how Microsoft would like us to connect to Azure AD joined machines so we can expect NLA authenticated connections to work some time in the future.

Happy connecting!

Morgan

How to find the GUID of your Azure AD tenant

All Azure AD tenants are named as sub-domains of the root onmicrosoft.com. For example yourcompany.onmicrosoft.com. Some very early adopters of eg. Office 365 might also have tenant names that look like this emea.microsoftonline.com, but AFAIK all new tenants will inherit the onmicrosoft.com domain. But names are fickle, so every Azure AD tenant also has a Globally Unique IDentifier, or GUID that is guaranteed to be unique (as the name implies) within Azure AD.

When you sign up for a service like Office 365, which uses Azure AD in the same way Exchange Server uses Active Directory. You can immediately start using services like Exchange Online and Skype with your default Azure AD tenant domain. Needless to say, it is not a user friendly domain name, either for logons or receiving email, so almost everyone adds one or more custom domains.

Sometimes it might be useful to know what the GUID of your tenant is. Perhaps you need it to file a support request, or you want to work out what is going on when you do federated sign-ons against Azure AD or you are working with Azure AD B2B.

Finding the GUID is not as easy as you might think. It is not displayed in the Azure AD portal, nor is it available in Azure AD PowerShell. You actually have to dig a little to find it. Sometimes it pops up in your browser address bar when you log in, but you have to be sure that it actually is your GUID that is display there, and not someone else’s.

Here is the easiest way I have found to display the GUID:

  1. Log into the Azure AD Portal (manage.windowsazure.com)
  2. Find or create a custom application that is integrated with your Azure AD tenant. To create a new application is very easy and you can immediately delete it once you have what you want.
  3. Press the View Endpoints button at the bottom of the screen.
    azureadguid1
  4. In the dialogue that pops up, your GUID is the long sting directly behind login.microsoftonline.com:
    azureadguid2
  5. Copy your GUID and store it in a safe place.

If I come up with an easier way to find the tenant GUID I will update this post.

Morgan

Speaking at Nordic Infrastructure Conference (NICConf) 2016

Just got a confirmation for two of my session suggestions for NIC 2016. Join me in Oslo February 3-5th 2016!

Here are the sessions I will be giving:

Azure AD B2B and B2C: The next generation collaboration has arrived
Level: 300
Azure AD Business-2-Business and Business-2-Consumer are two new features of the global trust fabric that is Azure Active Directory. With Azure AD B2B many of the identity challenges of collaborating with partners are no longer relevant. The complexities and cost of federation, and the security issues with maintaining accounts for your partners are no longer necessary. Join me to learn how to use these new features to allow anyone you choose to securely use your applications and access your data. We will also cover B2C where Azure AD finally integrates with the major social identity providers like Google, Microsoft Accounts and Facebook to allow you to share data and applications with consumers.
Azure AD Domain Controller Services (DC-as-a-Service): Get rid of Windows Server AD once and for all
Level: 300
Azure AD offers the next generation identity platform built from the ground up to enable the cloud. As more and more organizations adopt and move to Azure AD the need for the traditional Active Directory infrastructure dimishes. But it can be very hard to get rid of our oldest AD dependent applications. With Azure AD Domain Controller Services we can finally take this last step and retire our old domain controllers. Azure AD DCaaS can use Azure AD to emulate a domain controller and thus let us run all our legacy applications while only using Azure AD. Join me in this sessions for a highly technical overview of this new technology.

Hope to see you there!

Morgan