Introduction
A computer’s affiliation can change in many ways:
- From workgroup to domain.
- From domain to workgroup.
- From one domain to another domain.
Common to these scenarios is that the user or users using the computer loose access to their locally stored user profiles. When a computer joins a domain it usually means the persons using the computer are given domain accounts to use to log on. The local profiles stored on disk are not associated with these new domain accounts and, even though it is the same person using the computer, he or she loose access to the profile and thus all their settings.
The same is true when the computer leaves the domain. Domain based account can no longer be used to log on to the computer and the persons who use the computer must start logging on with local user accounts. Again the profiles associated with domain based users are not available to the new local user accounts.
Likewise when a computer leaves one domain and joins another, the persons using it are given new accounts in the new domain and these accounts cannot access the profiles of the accounts from the old domain.
Needless to say, this is a big problem for the end-users. The profile stores a lot of settings and reconfiguring all of these is, at best, boring. So how can we mitigate this problem for our users?
HKEY_USERS, HKEY_CURRENT_USER and NTUSER.DAT
The registry consist of several, so called, hives; HKEY_LOCAL_MACHINE, HKEY_CURRENT_USER etc. To fix the profile problem of our users we need to learn about the HKEY_USERS and HKEY_CURRENT_USER hives.
HKEY_USERS
The HKEY_USERS subtree contains all actively loaded user profiles. HKEY_USERS has at least three keys:
- .DEFAULT, which stores the profile used when no users are logged on to the computer (such as when the CTRL+ALT+DELETE logon prompt is displayed).
- A subkey named for the Security Identifier (SID) of the current local user. This subkey contains the current user’s profile. If the user is logged on remotely, the data for the user’s profile is stored in the registry of the user’s local computer. The data in HKEY_USERS\SID also appears in HKEY_CURRENT_USER.
- A subkey named for the Security Identifier (SID) of the current local user with the _Classes suffix. This subkey contains the current user’s Classes. The data in HKEY_USERS\SID_Classes is also contained in HKEY_CLASSES_ROOT.
Figure 1 HKEY_USERS
In the picture above there are 5 loaded user profiles:
- .DEFAULT
- S-1-5-18 (NT AUTHORITY\SYSTEM) which is Local System.
- S-1-5-19 (NT AUTHORITY\LOCAL SERVICE) which is Local Service.
- S-1-5-20 (NT AUTHORITY\NETWORK SERVICE) which is Network Service.
- S-1-5-21-1777867841-237173671-2295844794-1001 which is a local user account (called OldUser in this case).
If another user were to log on the computer, either through Fast User Switching or if the current user launches a program as another user, a new SID will appear under HKEY_USERS representing the registry hive of the new user. When a user logs off his or her hive is unloaded from HKEY_USERS.
HKEY_CURRENT_USER
The HKEY_CURRENT_USER subtree contains the user profile for the user who is currently logged on to the computer. The user profile includes environment variables, personal program groups, desktop settings, network connections, printers, and application preferences.
The HKEY_CURRENT USER subtree does not contain any data. It just stores a pointer to the content of the HKEY_USERS\ Security ID (SID) of the current user subkey. Therefore, the content of that subkey also appear in HKEY_CURRENT_USER, and it can be viewed and changed in either location. This subtree provides easier access to the data.
A new HKEY_CURRENT_USER subtree is created each time a user logs on. The data for the subtree comes from the profile of the current user. If no profile is available, the subtree is built from the user profile settings established for a default user, which are stored in %Systemdrive%\Documents and Settings\Default User\Ntuser.dat (Windows <5.1) or in %systemdrive%\Users\Default\ntuser.dat (Windows 6.0<).
Figure 2 HKEY_CURRENT_USER
NTUSER.DAT
Each user’s registry hive is stored in the user profile in the NTUSER.DAT file. When a user is logged on the contents of NTUSER.DAT in that user’s profile directory is loaded into HKEY_USERS and also mapped into HKEY_CURRENT_USER. Inside a session the HKEY_CURRENT_USER always maps to the registry of the user who is logged on to that sessions. If a user starts a program as another user, the session created for that program, which has the other user’s security token, will see its own registry settings in HKEY_CURRENT_USER.
Profiles and permissions
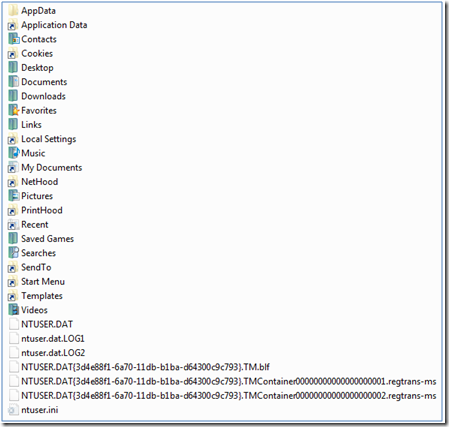
As we have established the registry hive of a user is located in the users profile directory, and stored in NTUSER.DAT. But a profile contains much more than just a registry hive. It also consist of several directories containing everything from mail items to favorites.
Figure 3 A typical user profile on Windows Vista
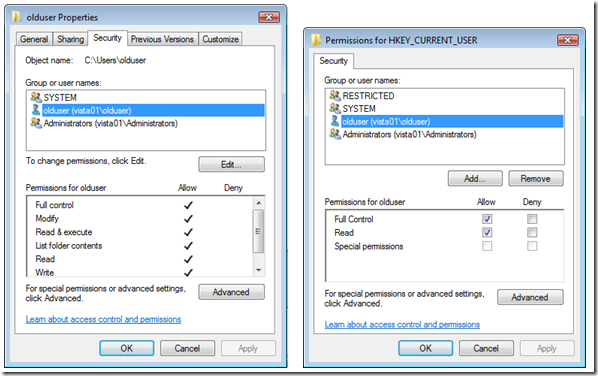
The user owning the profile is given full control access to it when it is created, both in the hive in NTUSER.DAT and in the file system.
Figure 4 NTFS Permissions and registry permissions in a user profile
The HKEY_LOCAL_MACHINE hive contains a section for mapping user SIDs (and GUIDs) to the correct file system folder containing the profile. The path to the key is HKEY_LOCAL_MACHINE\SOFTWARE\Microsoft\Windows NT\CurrentVersion\ProfileList.
Figure 5 The ProfileList key
The ProfileList key contains a listing of every SID that has ever logged on to a computer and under the SID key the ProfileImagePath value points to where the profile for that user is located in the file system.
Note also the Sid value which contains a hex representation of the SID of the user owning the profile.
Domain joined computers also have a ProfileGuid key at the same level as the ProfileList key. The ProfileGuid key contains GUID to SID mappings for profiles.
Transferring the profile
From what we learned about the ProfileList key, transferring a profile to another user should be as easy as changing the ProfileImagePath value for the new user to point to the profile directory of the old user. Unfortunately, this will not work, even if the user receiving the profile is member of the local Administrators group. We have to change both the registry and NTFS file permissions to make the new user use the old profile. Here is what you do:
- Log on as the new user.
This created a profile directory and entries under the ProfileList key pointing to this new profile directory. - Log on as a user who is a member of the local Administrators groups. This cannot be either the user who’s profile we are transferring or the user who is to receive that profile.
- Change the NTFS permissions of the profile, giving the new user Full Control permissions on all files and subfolder. This is most easily done with an elevated command prompt and icacls.exe (or your permissions editor of choice).
icacls.exe c:\Users\olduser /grant VISTA01\newuser:F /T /C /Q - Load the NTUSER.DAT hive from the old user’s profile directory under the HKEY_USERS hive. Either use the GUI or this command:
reg load HKU\test c:\users\olduser\ntuser.dat - Grant the user receiving the profile Full Control to the entire hive. GUI or command:
subinacl /noverbose /subkeyreg HKEY_USERS\test /grant=vista01\olduser=F
(Note: There is a problem with SubinACL.exe that makes it not apply inheritance correctly. The above command circumvents this by adding the ACE to all keys.) - Unload the hive. Either through the GUI or with this command:
reg unload HKU\test - Update the ProfileImagePath value under the new user’s SID in the ProfileList key, to point to the folder of the old user’s profile.
- Log on as the new user.
- When you are satisfied that the profile is working as expected you can delete the profile directory of the new user (which has only been used once), and rename the old profile directory to the username of the new user. Remember to again update the ProfileImagePath value if you do this.
Another way
Windows also has a more user friendly way to transfer a user profile from one user to another. That way is accessed through the System Properties window.
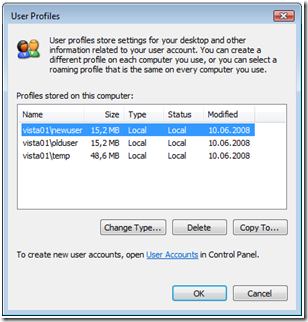
The Settings button reveals a list of all the profiles stored on the computer:
Here we can use the Copy To… button to copy a profile from one user to another.
We also need to change who is permitted to use the profile, using the Change button at the bottom of the dialogue.
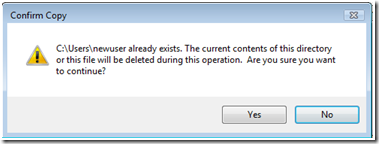
If the folder we are copying the profile to already exists, we receive a warning:
After the process is finished you can log on as the new user with the old profile.
This method does all the changes that the first method does, except changing anything under the ProfileList keys. In this case we are copying the old profile into the new user’s profile folder and there is thus no need to change anything in the Registry. Except from that it does what I showed before; change the file permissions and the registry permissions inside NTUSER.DAT.
Note that this method also requires that you on as the new user at least once to create the profile directory and the keys under ProfileList in the registry.
Which method you prefer is entirely up to you, but I’ll go with no 1.
What do you lose?
These are the items in the old profile that you lose access to from the new user:
-
Data that is protected by the Data Protection API (DPAPI)
DPAPI helps protect the following items:- Web page credentials (for example, passwords)
- File share credentials
- Private keys associated with EFS, S/MIME, and other certificates
- Program data that is protected by using the CryptProtectData() function
More information
- How to copy data from a corrupted user profile to a new profile in Windows XP
http://support.microsoft.com/kb/811151


